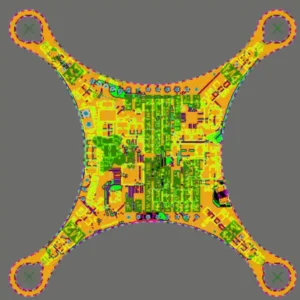
A drone PCB is a circuit board of a drone specifically designed to integrate with drone technology. It supplies power to the drone parts at the time when it is operating.
In a drone circuit board, the engineers can add precise structure to the electronic components on a circuit board. Drone PCB contains all essential electronic components needed to let the drone function without taking up much space.
The drone PCB has different features and structures, each with specifications. The drone PCB contains soldered copper wires that improve the performance of the drones and hence add benefits to their functionality.
Types of Drone PCB
There are different types of drone PCBs, and each style has its purpose of serving. The three most common types are discussed below:

Power Production Board for Drone
The PCB in the drone has the purpose of supplying electricity to the different parts of the drone. The older methods to supply electricity to the various components were to use wires and create soldered connections out of them to provide electricity. However, that resulted in adding weight to the drone PCBs so that proper power distribution was carried out.

Controller Board for Drone
The controller board for the drone is a circuit board in different sizes that helps in controlling the response of the RPM motor in the drone in correlation to the input signals. The controller board controls the engine’s speed when the drone is flying.

ArduPilot
ArduPilot is a controller software that is an essential type of drone PCB because it controls many things which are a part of the flight of a drone. This mechanism is also used in helicopters, submarines, and naval boats.
PCB applications
Features of Drone PCB

Firmware of the Drone PCB
The firmware of the drone PCB is significant because it helps in the modification of the drone board function. If you take the example of the KISS, firmware goes well when racing the drone. However, in the case of GPS location, the iNav is a better choice.

UART of Drone PCB
UART stands for the Universal Asynchronous Receiver and Transmitter, which contains multiple components of the drone PCB. It includes the drone boards’ telemetry, which helps create an interface with the hardware.

The processor of the Drone PCB
The drone processor, also known as the microcontroller, is used to carry out multiple functions in the drone. It helps manage the drone’s speed, the capacity to hold data, and deal with the firmware.

The layout of the Drone PCB
The layout of the circuit board drone contains soldered pads, which is a significant part of the design of the drone PCB. The drone boards that have pads on the edges are better as compared to the ones that have them at particular points only.

Black Box of the Drone PCB
The black box of the drone PCB is essential because it helps in troubleshooting and tuning the drone.
How To Make a Drone PCB
-
In the first step, you must cut the film in a size that is a little larger than the circuit to ensure it is not too large, or you will be stuck with it later, which should be slightly larger.
- Take the piece that you have cut out and now stick tape on it before you place it on the PCB.
- Take the marker and start marketing the areas where you will need the soldering points for the drone PCB.
-
Remove this board and cut down another film of the same size marking the soldering points again.
-
Use a stick, apply the soldering paste on the board, place the film on the frame, and mount it correctly.
- Ensure that the film and the board connectors are appropriately aligned and have their faces up on the indicated sides.
-
Use alcohol and clean the surface, and you can remove the solder paste which has dried by scratching it with care.
-
You can apply flux on it and clean the pad; now, using a soldering iron, you can solder the pads and edges of the board.
-
Use sandpaper and smooth the soldered points; your drone PCB is ready.
UETPCB – Your Ultimate Drone PCB Supplier
Understanding the process and features of the drone PCB is one thing, but choosing the right supplier for the drone PCB is another essential thing that is equally very important.
Many factors need attention in choosing the right drone circuit board. The quality, feasibility, appropriate distribution of power, and exceptional controls are fundamental aspects to focus on.
The right supplier will deliver a simple but steady PCB, affordable and durable, and UETPCB could be an excellent decision for this choice. Here, you will find the ultimate PCB for drones, which will help improve the functionality of the drones you manufacture in no time. So, get in touch with us today and have your quote. We also design custom drone PCB for our clients within their budgets.


