
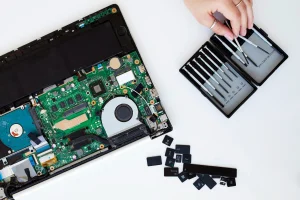
One of the greatest wonders in modern technology is the laptop. It is a compact version of the full-sized computer. Unlike a desktop, it doesn’t need a messy setup. You know it’s portable, easy to carry, and very light. However, creating a laptop isn’t as simple as making a desktop. Many brilliant ideas and innovations were behind its development. One of the most challenging tasks was making the laptop PCB.
If you open a desktop CPU, you will find three or even more cooling fans. Yes, heat is indeed a common concern for computers. When we create a compact version of the entire CPU, things become complicated. How to control this heat and how to maintain the high-frequency performance of the PCB.
This article explores laptop PCB components. You will also learn about how laptop PCBs are manufactured and assembled. You will also learn how to choose the right laptop PCB manufacturer for your project.
Laptop PCB Components
A laptop uses various types of PCBs. Each plays a specific role and serves a distinct purpose. Together, they work to run the laptop smoothly and help accomplish various tasks.
(1) The motherboard is the main PCB board inside a laptop. It interconnects all components, including RAMs, GPUs, SSDs/HDDs, USB ports, displays, and other devices.
(2) The laptop battery PCB board controls the power and charging flow. It helps the battery from overcharging and overheating.
(3) The laptop keyboard’s PCB is located under the keyboard. When you press a key, it sends a digital signal to the laptop, allowing the CPU to interpret and translate it.
(4) The display PCB simultaneously connects the GPU and the display panel. For touchscreens, it reads finger touches.
(5) The charging port connects the power adapter to the device’s circuitry. Here, the power delivery PCB protects against overvoltage and short circuits and features fast charging.
(6) The PCB houses several components, including the control chip, RF (radio frequency) antenna, and others. It allows you to connect with the Wi-Fi or Bluetooth devices near the laptop.
Understanding Laptop PCB Assembly
The process of making laptops involves assembling each computer part onto the laptop’s PCB. It could include both manual and automated steps.
Manufacturers now utilize cutting-edge and modern technology to assemble laptop PCBs. In this case, automated systems are becoming more and more common. It is especially important for putting small parts in place. It is now faster and more accurate to place SMT or THT components.
Throughout the whole process, strict quality checks are done. For hidden parts, makers like UETPCB utilize a wide range of inspection systems.
Key Steps in Laptop PCB Assembly
Several key steps are involved in assembling laptop PCB boards. These steps play a crucial role in achieving the best quality of your PCB laptop. From design to testing, every stage should proceed in a synchronized manner.
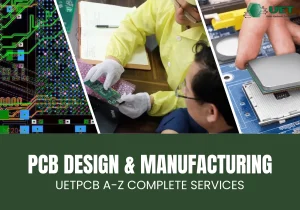
PCB Design and Material & Component Selection
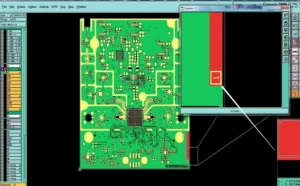
PCB design starts with advanced software. Engineers plan layouts and layers for the PCBs according to needs. Alternatively, you can provide your design. In this case, if your design requires any changes, they will make the necessary updates.
During the design process, you must determine the specific materials to be used. In this case, FR-4 or high-Tg is typically used to create PCBs. These materials can withstand heat and stress easily, thereby improving their quality.
The most important part of putting together a laptop PCB is choosing the parts. Most laptop computers need micro components. These parts are very small but highly capable of processing signals. Therefore, it is essential to be cautious when selecting these parts to achieve optimal results. In this case, ensure the parts align with the plan and meet the power requirements.
Microscoping Assembly Techniques
The microscoping assembly techniques typically involve a step-by-step process. It begins with incoming quality control to check materials. Once approved, workers begin the assembly.
They apply adhesive to surface B of the PCB. Then, they place the surface-mount devices (SMDs) on it. After that, they dry the soldering paste and let the adhesive solidify.
Next, they coat the surface with soldering paste. Then, they perform the SMIC step. After SMIC, they dry the paste again.
After that, workers plug in the components and then perform wave soldering. After that, they clean the product to remove any residue. Finally, they test the product to ensure it works perfectly.
Each step in this microscoping assembly is very important. Every worker must follow the steps carefully. The microscoping assembly technique typically helps build high-quality electronic assemblies.
Testing & Quality Control
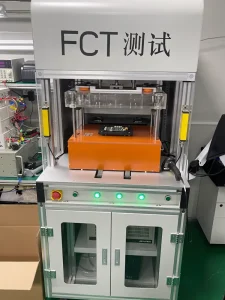
When it comes to laptop PCB assembly, various testing methods are needed. Visual, AOI, X-ray, and functional testing are noteworthy in this case.
Visual inspection is typically what you see with the naked eye. Skilled QC engineers inspect the board for scratches or cracks. However, this is not enough. We need more advanced testing methods like AOI and X-ray. Using this tech, you can verify the quality of the inside board and detect missing parts. Finally, the functional test is necessary to ensure the board is operating correctly.
Challenges in Laptop PCB Assembly
Laptop PCB assembly requires high-precision work. If tiny components are packed tightly, it may increase the risks of soldering and placement errors.
Make sure the pick-and-place machine operates accurately. Keep your parts aligned within microns. Otherwise, you may face defects or failure.
Another crucial aspect is managing thermal profiles. Use precise heat control during reflow or vapor phase soldering. Using extreme heat or fast cooling may cause the board layers to crack or warp. Sometimes, multilayer stackups may complicate the heat flow. Therefore, use perfect tuning to avoid it.
You may face solder joint defects. It is a common problem. These issues are like tombstoning, insufficient soldering, bridges, and cold joints. Primarily, these defects arise from improper soldering, material issues, or environmental factors. Therefore, ensure you use the correct soldering method.
There are inspection limitations, too. Use AOI for surface inspection and X-rays for BGA hidden parts checks. Incomplete inspection raises the risk of field failures. On the other hand, partial inspection may lead to blunders.
Integration and cleanliness can impact yield. To keep things safe, clean the PCB and handle static-sensitive parts with care. It typically makes the depaneling process safe.
The Role of Professional PCB Assembly Services
Laptop PCBs are compact and often handle high-frequency tasks. It is easy to increase the heat in such a compact size. Thus, professional PCB assembly services are so crucial for laptop PCB assembly.
Companies that are professional and successful will offer you high-quality work, no doubt. Like UETPCB, the company has the capabilities of dealing with micro PCB components. They offer high-tech soldering tools. They also make sure that each piece goes in the right place. It usually helps to reduce mistakes and save time.
A professional PCB assembly team is always equipped with skilled engineers. This way, you can refine ideas and production goes faster. Eventually, you can ensure on-time delivery of the product.
Box Building: Final Laptop Assembly
The box building process is the final step in laptop assembly, following the PCB assembly. It brings all the parts together in the laptop shell. These parts include the motherboard, battery, display, and various other components. This way, it ensures a complete laptop that works properly.
Combining mechanical and wiring
In this step, each cable and connection is interconnected with parts. There are wire link cables that connect the display, battery, keyboard, USB ports, and other components. Besides, the mechanical parts align perfectly to avoid technical errors. Here, brackets and screws secure parts and hold them tightly in every place.
System integration and testing
Hardware, RAM, memory modules, coolers, and other computing products become attached. This makes a fully functional laptop.
Following this assembly, a final check is conducted. This testing enables you to assess the performance, durability, and safety of the product before it reaches the end user.
Choosing the Right PCB Manufacturer for Laptops
Choosing the right PCB assembly manufacturers for laptops might be tricky. Not every manufacturer can offer you high precision, especially for micro-component assembly.
Understanding the requirements
What purpose do PCB boards serve? Know your requirements, like the size, layout, layers, and complexity of your boards. Knowing them will help you meet your standards. Based on these requirements, choose a reliable manufacturer.
Manufacturing & Assembly capabilities
Check if the maker can handle multilayer, fine-pitch parts and offer SMT. They should have modern machines to assemble PCBs at a smooth pace with flawless work. Good assembly capability means fewer mistakes and better products.
Lead Time and Price
Lead time and cost are also necessary. A professional manufacturer always gives you a proper timeline. Also, they offer a quick turnaround without sacrificing quality. They will provide you with a balanced cost within the budget.
Custom support and service
Strong customer service is a must. Don’t forget to check customer reviews and after-sales services. A trustworthy manufacturer will support you throughout the design, production, and after-sales process.
Conclusion
In this century, PCBs are leading the world. We cannot even think of running a device without it. To keep pace with these modern technologies, we must stay up-to-date.
Building a laptop circuit is a complex process. From prototyping to ensuring end-user supply, every detail matters. This article has highlighted everything related to PCB manufacturing. When choosing a manufacturer, consider their one-stop solutions for laptop PCB repair. Hopefully, this solution could meet all of your needs.
Contact us today to receive expert advice, prompt support, and exceptional results!